It’s finally time to get into one of our favorite reviews to date! The RatRig V-core system is a cutting edge CoreXY printer kit which you can pick up as a frame only, or an entire kit. The system has proven within the community to be fast, efficient and quite accurate. Some of the features like the 3-point kinematic bed, and the bed mounting methods are the bleeding edge of technology in hobbyist and prosumer 3D Printing. The RatRig team call the V-Core the CoreXY 3D Printer with NO compromises, and we can see why! During the benchy speedboat competition, We see some are printing sub-5 minute benchy boats, and it’s quite impressive!
Rat-Rig sent us the 300mm frame kit several months ago, and we had to source the electronics, motors, wiring, electronics panel, build surface, extruder, hot-end and Z probe. We opted to use the same parts as our other printers, because we like to have spares on hand. Our “recommended” build spec and tool requirements for our Rat-Rig V-Core build is as follows.
- E3D V6 Volcano Hot-End (24v)
- EVA Gantry System, with UHF Ducts
- Orbiter 1.5 or 2.0
- LDO 42STH48-2504AC (Special Ordered via LDO Motors @ Alibaba instead of RR)
- BTT Octopus 1.1
- Meanwell 24V PSU
- DIY Electronics Panel, or Pre-Drilled via sources.
- Crydom 50 Amp SSR (Or alternative name-brand SSR) https://amzn.to/3pszhyw
- JST crimp tool https://amzn.to/35GbxQs
- DIY Connectors https://amzn.to/3szIibl
- 22AWG Silicone Wiring (Sensors, etc) https://amzn.to/35FOyoW
- 14AWG Stranded Copper Wire for 120v Connections
- IEC Power Connector https://www.ebay.com/itm/162638328160?var=463792571266
- Raspberry Pi 3B+ or 4 (2gb or better; hard to find in-stock, check eBay listings!)
- 2 to 4 Female to Female Dupont Connectors for Raspberry Pi Power & Serial
Assembly
This was easily the most challenging printer build we have ever taken on, we had to print many parts and source things that are usually included in a kit. It took us quite some time during other reviews and our full-time jobs to get this thing put together and tuned properly. The electronics panel will certainly take some creativity, and nobody else is listing the size of the panels you would need for a 300mm DIY kit (17 1/2″ x 16 1/2″ for our panel).
Initially all we had on hand to assemble was the frame, so we unpackaged the entire kit and laid out the frame pieces. I used an Allen/Hex socket, and socket wrench to tighten all of the frame bolts. This is the part of the assembly that I urge you to take your time. Assemble the frame on a hard surface, and have your tape measure and square with you. The frame being square is of utmost importance on this type of printer. If you do not have a properly square frame, the linear rails for the X and Y axis will bind up, or you will have belt path issues. I will say that the frame assembly instructions were quite simple to follow, just make sure you are using the correct length of 3030 extrusion for each step.
Important Link: https://ratrig.dozuki.com/c/Rat_Rig_V-Core_3
XY Drive, Idler Assembly
For this portion of the assembly I recommend setting aside at least 2 to 4 hours, because it needs to be done properly. You may be able to save yourself some time with a few of our tips, because we had to search some things and lookup methods for certain things which were not in the instructions.
Once you have gathered all of your printed parts, I recommend using a proper sized drill bit and to chase your holes. Whatever size the thread of the bolt, use a drill that matches and chase the hole (M3 Bolt use M3 Drill, etc) and this will save you time during assembly. I also recommend taking this time to insert any of the nuts which are press-fit into the parts, using a bolt to pull them into the part as seen in Preparations.
Take your time and ensure that each spacer and pulley is used in the proper place. After the XY assembly is complete, we went back and verified our motor pulleys were in the correct height. You want the belt path to be through the middle of the pulley, not rubbing the bottom or top.
Linear Rails
The linear rail portion of the setup was quite simple, as long as you have the printer piece to help you locate center. I did not tighten the rails immediately, as it was suggested not to. We tighten these once the gantry was in place, and test the motion. We tighten the Z linear rails once the bed mounts, and drive screws were in place.
Make sure to specifically follow the preparations for all linear rails, this will be imperative to your success. The motion system from RatRig is amazing, once the linear rails are properly cleaned and lubricated. This is a tedious process, and I suggest reading the entirety of information available to you before attempting anything.
X Gantry
The X gantry is one of the portions of the assembly which gave us some trouble. We had printed parts in PETG to match, but when we tried to press the gantry extrusion into each gantry block, it didn’t seem to want to go in far enough. We decided to re-print our parts in ASA after breaking one of the gantry blocks. The X gantry linear rail should touch the X gantry block on both sides, if it’s not touching or very close you are not entirely in the block.
You will find detailed instructions provided by Rat-Rig here: https://ratrig.dozuki.com/c/Rat_Rig_V-Core_3. I also recommend joining the Discord for Rat-Rig via this URL: https://discord.gg/aS8UXN4a.
Belt Paths
When you are first inserting your belts into the belt paths, a good tip I learned from reading online is to use a plastic zip-tie as your guide. Insert the zip tie through the path, place the belt on the zip tie and pull it through. Alternative and even more efficient is to use the opposite side belt. Insert it through the opposite end of your belt path, and mesh the belts together. Once you have the belts meshed, simply pull it through.
Electronics
I cannot attest to the completeness or quality of the kit directly from RatRig, because I opted to source my components myself. I will tell you that it takes so much longer to source them yourself, and I wish I had just got everything at once from RatRig and I would if I had known. The assembly of the electronics is not difficult for someone who has been around 3D Printing for awhile like myself, but if you are a complete novice to electronics I advise you to seek help from a qualified professional or tech-savvy friend.
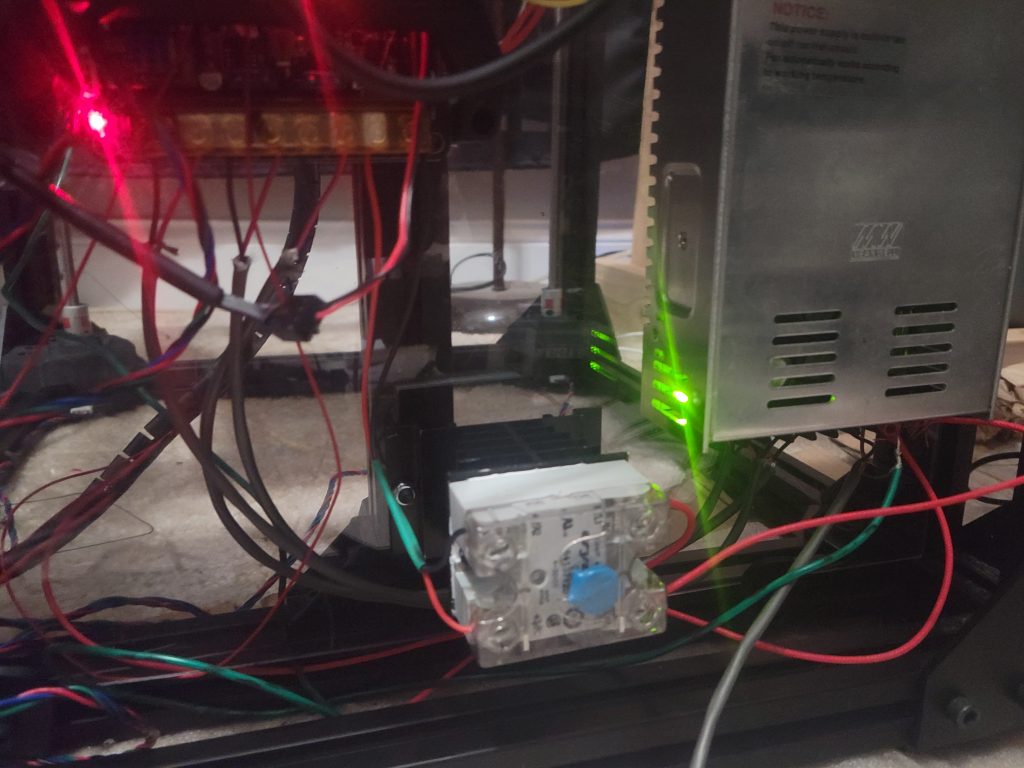
This kit will require you to wire up DC heaters and the use of AC powered bed-heater requires an SSR which can pose risk to someone who knows nothing about electrical. Do not take chances of burning down your home for a 3D Printer, make sure it’s done properly and all precautions are taken. I opted to use a fused 120v outlet for additional protection, and will later add another DIN mounted breaker to this build for added safety.
I would also urge you to place a ground strap on the bed mounting plate, which will aid in reducing EMI as well as reducing risk of shock from the AC bed heater. We ran a green jacketed copper wire from one of the holes in the plate, to the ground terminal on the PSU. I think using a name-brand SSR is also an important choice, as these cheap SSR from China are extremely over-rated and many could be a fire hazard.
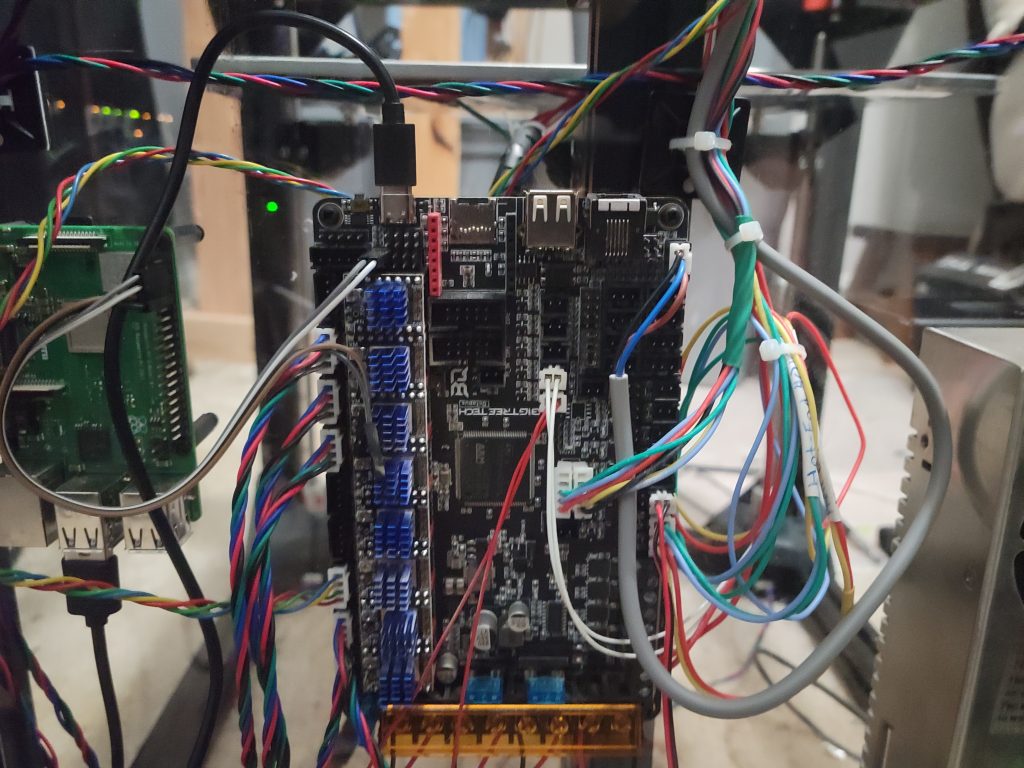
The drivers and control board you pick are an important step, and most users will be fine with the TMC 2209 drivers on any 32 bit control board. If you plan to go as fast as possible, and want to reach for those 1000mm/s speed such as other users have; I suggest going for the higher-voltage TMC 5160 on BTT Octopus 1.1 to allow you to push your stepper drivers to 48v or more, thus reducing the amount of current needed to operate the steppers at high accelerations. Definitely plan to use fans on your control board regardless of which steppers you choose!
Don’t forget to pick up a Raspberry Pi 3B+ or Raspberry Pi 4 2GB or better. It will be required for the RatOS/Klipper firmware and there are chip shortages still ongoing. I had to buy my Raspberry Pi 3B+ from a third party on Reddit, but many people are finding them on eBay as well. I refuse to pay 100$ or more for a board that is supposed to be 35$ so start early and be patient, you can still find them at a good price.


LDO Motors
We had to make sure we gave these guys their own section and also give some tips on motor install. LDO Motors are one of the key components to making this RatRig Printer run reliable and efficient. Not only are they the best motors you can buy at an affordable price, they are proven time and time again. I had to upgrade my Orbiter’s motor to an LDO also and eventually with go with the LDO 2.0 Orbiter as well. I was shocked at how good the quality of the motors and the motor cables. They are much thicker wires than what you usually get with Chinese motors. Make sure when installing your motor drive gears to align them with the belt in the middle of the pulley. Do not let the belts run on the outer edges of these pulleys. I would recommend using LDO motors on any project, or when you are replacing a stepper that has burned out. Definitely spend the few extra bucks and get an LDO, they can run more current, and last longer!
Quality
The big feature of this CoreXY printer is the firmware comes with pre-configured templates for your build; this gives you a huge jumpstart on quality right out of the box. This printer has the best “out-of-box” quality you will get for this price. I understand that out of the box quality is going to be subjective with a kit like this, but I mean as a complete kit from RatRig it’s quite impressive. Our tests show that the stock configuration for the LDO 1404 and 2504 are spot-on and our 20mm calibration cube was indeed 20.1mm x 20.1mm x 20mm on our first attempt.
All hardware and features of the RatRig V-Core line are customizable, therefore each persons experience could be a little bit different. I have had great luck with the RatOS firmware, as well as being immensely pleased with the quality of the parts I received from RatRig. Everything about this printer feels like high-end industrial, and like it is leagues better than any off the shelf Creality or BIQU printers I have dealt with in the past.
I work daily with industrial thermoforming machines, and quality of the machine and materials used always result in better parts being made. When I was just beginning to learn plastic process engineering, my trainer always used to say “Shit in, Shit out” and it stands true for FDM plastic as well.

Overview
There are many mixed opinions online about the RatRig V-Core line of printers, where many are ranting about how great the machine is. On the other hand, many people believe it is too expensive. I have to agree that it is on the expensive side of hobbyist 3D Printing pricing, but you get what you pay for in this economy. If you want a budget-friendly 3D Printer you can choose a Creality. If you want something that is high-end and properly engineered to print high quality parts fast and efficiently, spend the money on the RatRig. I would suggest it over any other printer on the market as of right now, and their other offerings are amazing as well. The competition in this market is all going to be industrial grade equipment, and in my opinion RatRig has brought us entry level industrial equipment at a prosumer pricing; which is amazing for someone like myself! If I had to choose between a Prusa print farm, and a RatRig print farm I would always choose the latter.

Suggested Improvements
One of my suggestions for RatRig would be to skip the suggestion of PETG parts all together. I think ABS should be the minimum for the printed parts, and especially for printers which are getting an enclosure. If you think about it, although PETG is fairly strong the ABS counterpart is much more temperature resistant. Many users have issues with printing ABS, and if you are one of those people then I recommend trying ASA. ASA is almost identical to ABS in formulation, but less susceptible to warping in my experience. I recommend using Prusament ASA.
Another thing that was really annoying and took up quite a lot of my time during assembly was the sizing of the holes in the printed parts. Every bolt was really tight, and required me to drill or clean up every single hole. The guys over at Vector3D have implemented this change on their GitHub, but RatRig should do this to the stock offerings as well. I can understand keeping tolerances tight, but opening the holes up which the threads go through 0.5mm is a great improvement. Visit the link below if you are interested in those printed parts.
https://github.com/AdamV3D/V-Core-3-Vector3DEdition